Reviews
KC180 Build
Posted on December 7, 2015 • 11 min read • 2,202 words
I had seen Chi Lau post about this frame and watched a couple of videos of him using it, and it looked very fast! He was flying extremely quick for a 180mm size quad and even running a RunCam on it for recording, so I knew it had to be light to do the tricks he was doing!
Frame Specs
- Extremely high quality gloss carbon fiber.
- “X-Frame” design with 3mm thick arms, 1.5mm thick top and bottom plates and 1mm thick top arm brace. Unique arm replacement design means quick repairs. 2mm arms will also be available!
- 180mm size frame for 4" props and 1306 size motors (around 3100 or 3300kv)
- Built in Power Distribution Board (PDB) with 5v regulator to power the flight controller and an XT30 battery connector pre-soldered. There’s also front + rear solder pads for auxiliaries such as FPV gear.
- ~175g All Up Weight (AUW) build (minus Lipo) for a super light weight race setup. This will be particularly good in indoor or smaller courses where agility is key to get that edge.
Electronics
Choosing the electronics was a simple process - I planned to gut them from my Skunkworx Hobbies Kermit build and basically just drop everything in. This was already a good setup for this style ua Here’s the spec list:
- DYS 1306 3100kv motors
- FVT LittleBee 20A ESCs
- HQProp 4045 (non-bullnose)
- RMRC DoDo F3 Flight Controller
- FrSky D4R-II Receiver
- Foxeer HS1177 CCD FPV Camera
- FX799T 25mW Video Transmitter
- Fatshark Circular Polarized Antennas
The Build
So, let’s get down to business! I’ll let some pictures do the talking, it really is a work of art!
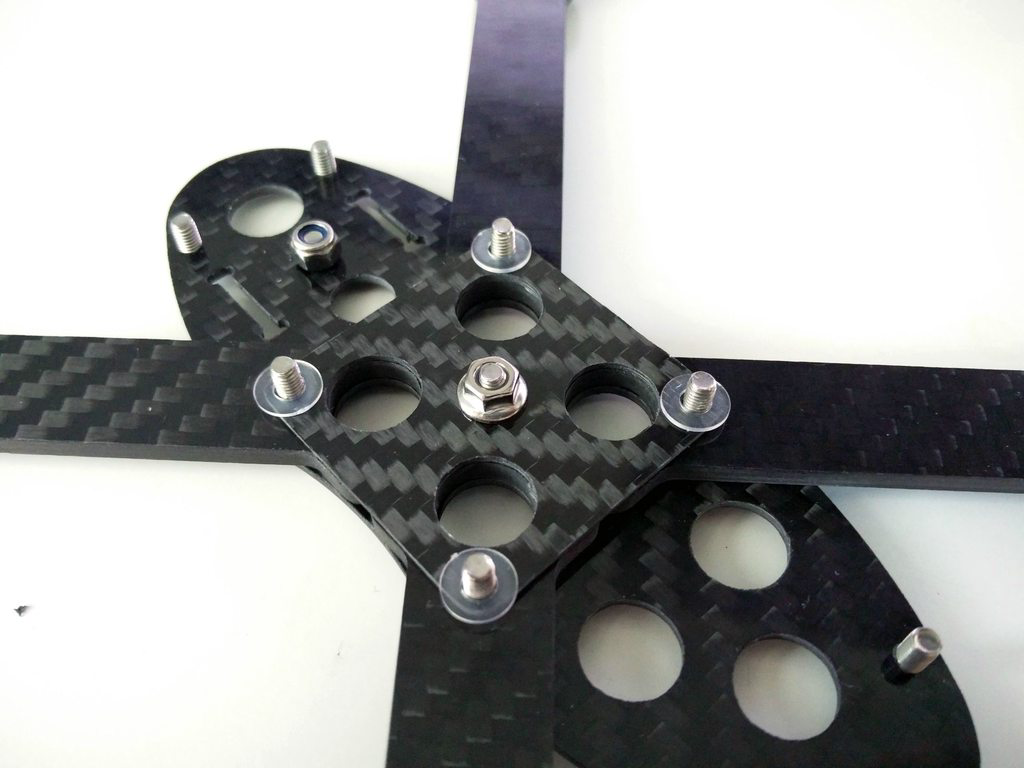
Here’s a few stages into the assembly with the arms bolted on, and the plate above that being fixed with the flange nut. You’ll see further down why this is used, such a unique design I have not seen this used in this way before, and it seems brilliant! We can see some nice weight saving in the middle, bonus picture later on and again, more on that further down.. :)
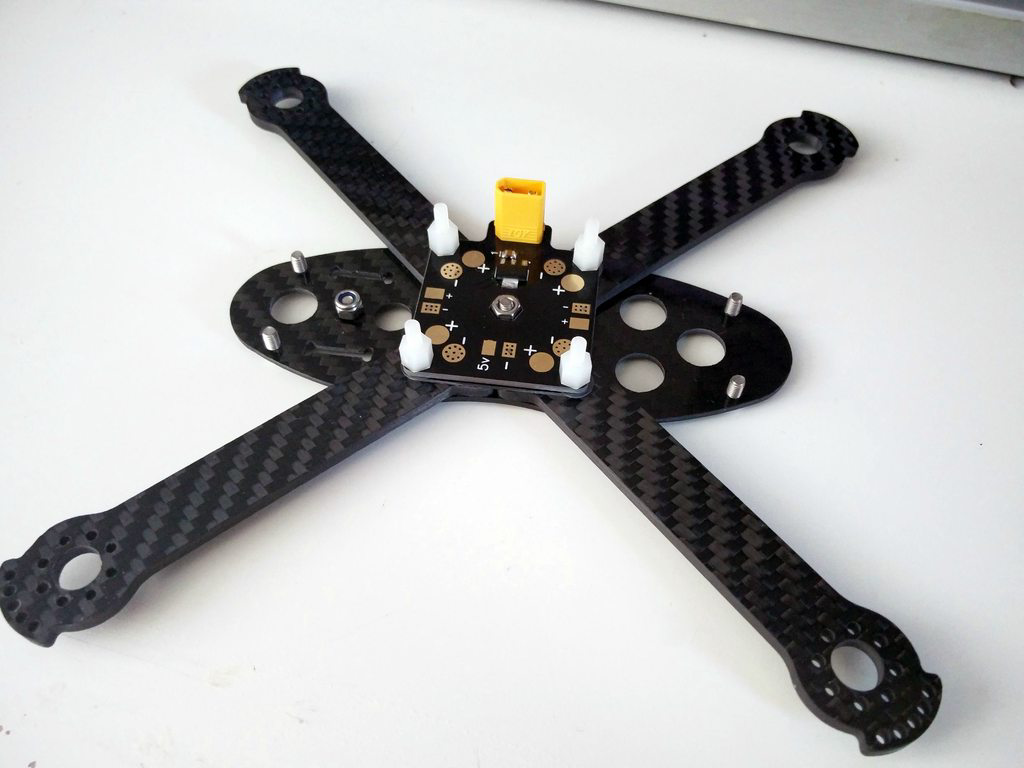
So here you can see I’ve got the PDB in place now, and we can still see the flange. The PDB interlocks with the flange so that if you need to replace an arm from a crash (which I think would be unlikely), you only need to loosen up the bolt from underneath thats screwed into the flange nut, and then just simply unscrew the single arm screw. I really, really like this idea and have not seen anything like it before - I have had to replace arms in the past from crashes in a racing tournament, and just simply saving time like this is a godsend.
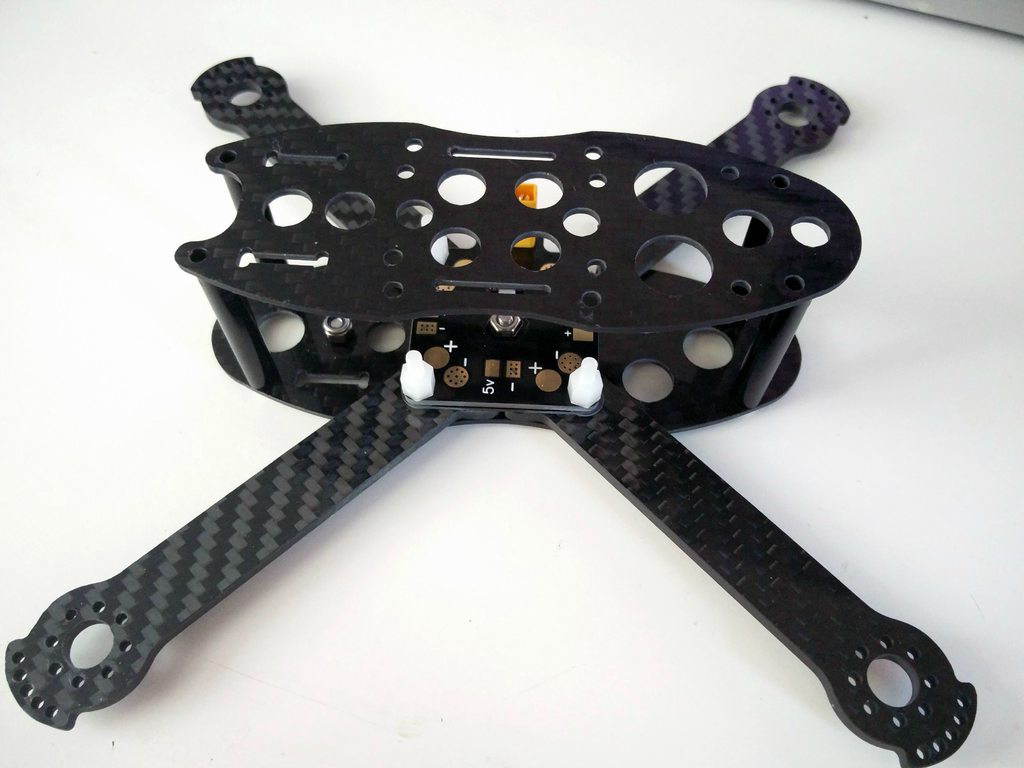
I’ve just sat the top plate on so we can see a few things here (without screwing it down, we need electronics in yet!!). Firstly, you’ll notice a nice big cutout for the camera - this should allow you to get at LEAST 50 degrees if you want to fly like BanniUK or Charpu. Because the frame has the slot cutouts, you can place the camera as forward, or as backward as you need, so that you can also put the camera at any angle you want to fly with, but still have the camera sat behind the front of the carbon plates so that it’s protected when you do crash. There’s also some other nice considerations with a SMA/RP-SMA slot at the back to hard-mount your VTX connector (or pigtail) - again this is something often found on frames and I tend to use these, so I’m glad they’ve added it here. There’s also battery strap slots on the top plate and various other weight saving holes you could use for different things, or for cable-tying components in place).
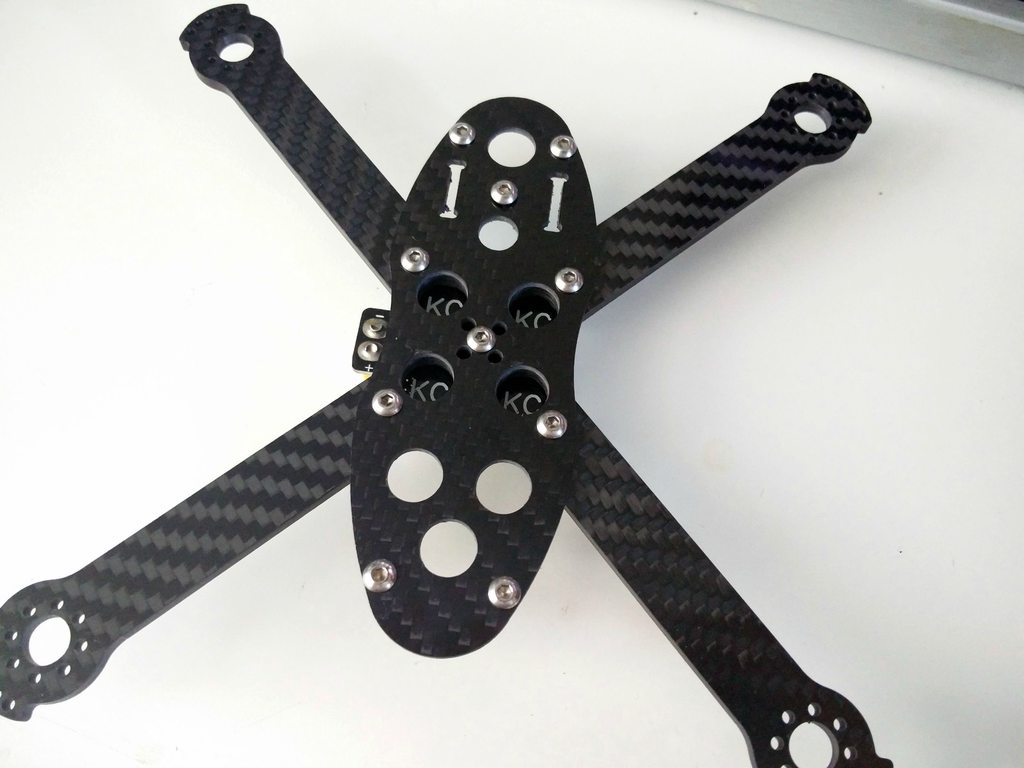
So here’s that sneak peek of the underside I was telling you about earlier - it’s the simple things (or not so simple in this case) that I like about new frame designs. The text you see is actually printed on the PDB - a nice touch from what would otherwise just be a blank space :)
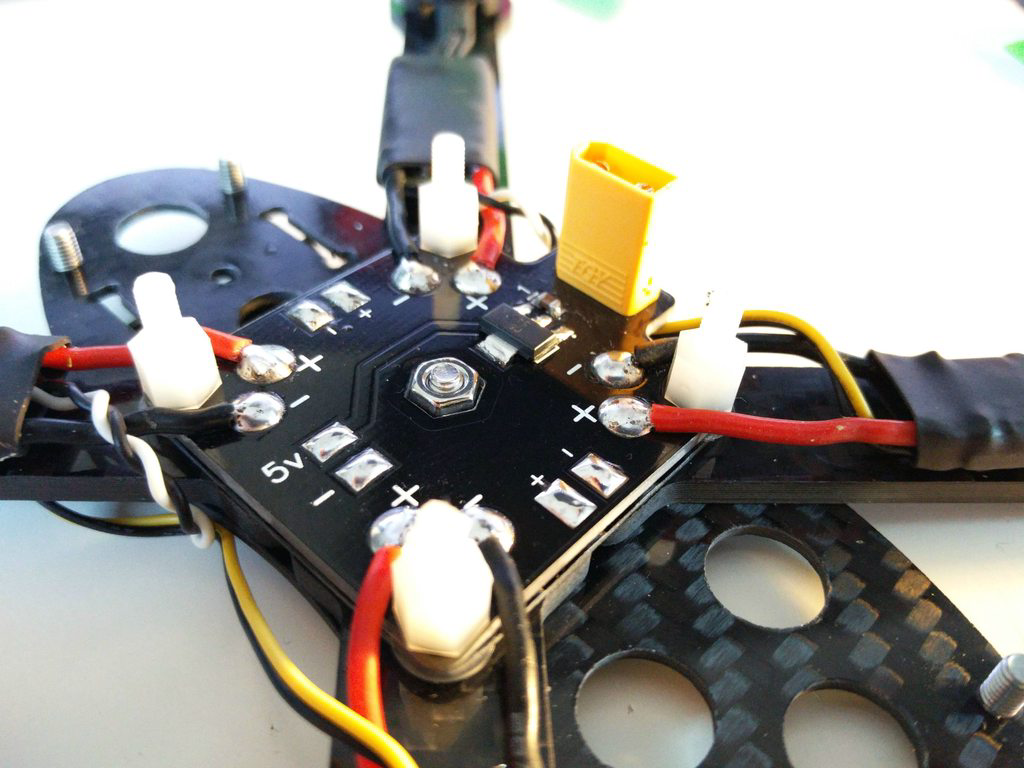
So anyway, we need to get some electronics in don’t we? As I said above in the spec list, we have some LittleBee 20A - as you know always a little overkill in ESC spec’s for a build of this amperage (they will only draw around 6 amps at 100% throttle), but they are superior in Damped Light Braking to competitor ESC’s and of course their size + weight is not currently matched by lower rating ESCs. It’s a no-brainer to use these in small brushless setups, even in smaller frames. The PDB features gold pads of nice quality, making soldering an easier task than some.
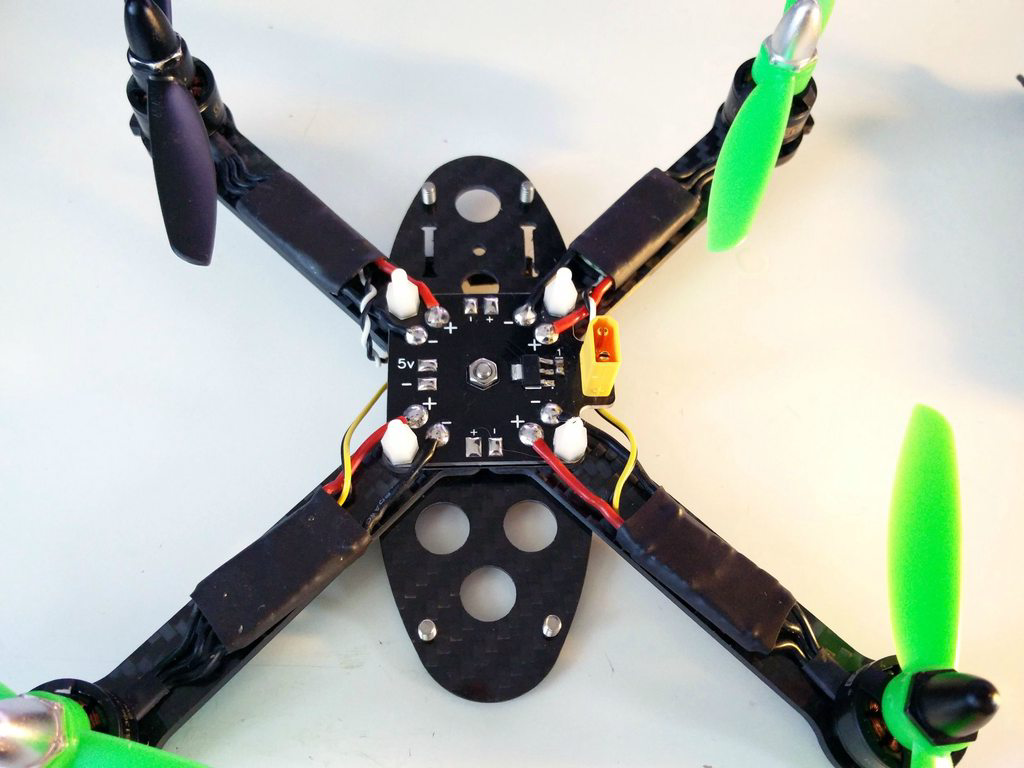
Here’s a bonus wide shot of the ESC’s, they were still attached to the motors from the previous build, so the ESC power wires were cut to length for the install rather than adjusting the motor wires (less soldering to do :) ). I’ve left the signal wires out of the picture for now, but these are quite long in length and have servo connectors, so they will be shortened and direct soldered to the flight controller for the build to keep it a super light setup. With the BLHeli Passthrough now available on pretty much all Flight Controllers (using Cleanflight and Betaflight) there’s not really any excuse to not hard wire it. If you crash bad enough you need to be replacing a motor or esc, you had better hope you have a soldering iron on you anyway, so this would just be another small step in fixing up the quad for the next flight.
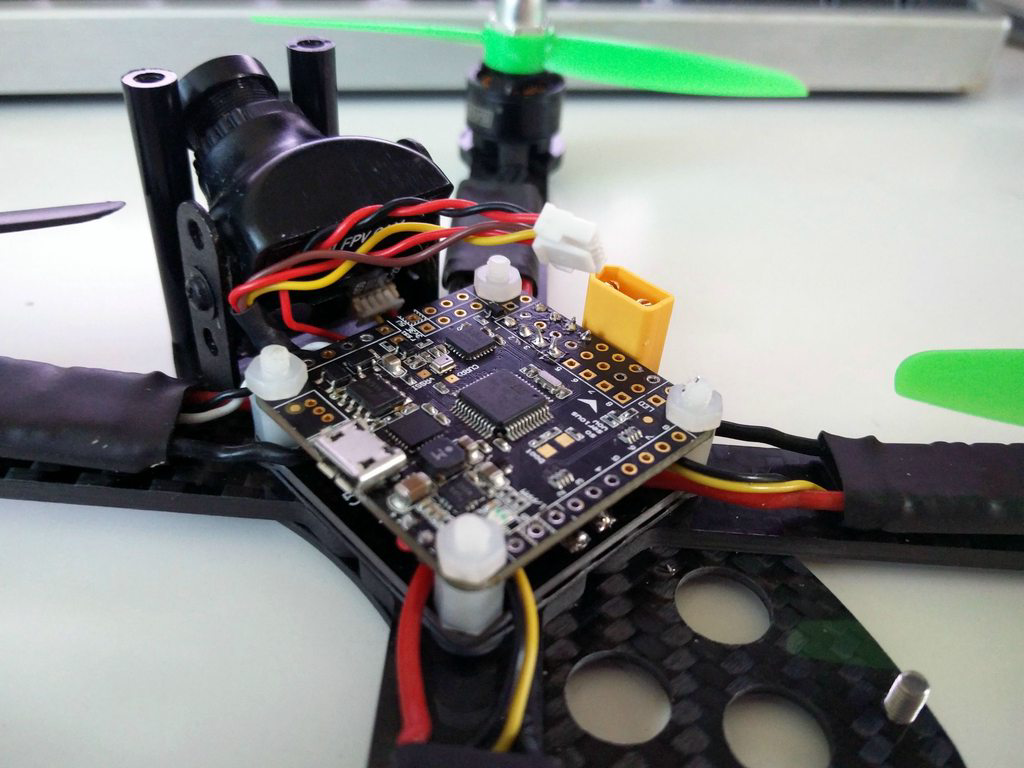
We then move on a few steps in the build past a few of the mundane tasks (finding the right camera position and ESC to flight controller soldering) - but we now have the camera in place with the loom wired in. The FX799T has a single loom which feeds in wide-voltage (7-20v) from your power source (the PDB in this case), but also has all 3 connections required for the camera (including 5v power), making it a super tidy wiring install - something which is very much needed on a small quad like this. I’ve hooked in power from the front pads on the PDB, and luckily the loom (taken from the Kermit) is the perfect size for my VTX to fit where I had planned - in the top of the frame.
As for the flight controller, I’ve now hard-wired the ESC’s in place (soldered directly to the pin headers), and kept the wires a little longer than required just so that if need be I can lift up the FC to perform any maintenance without having to unscrew the motors and taking the whole power setup up and out the way. I’ve also hard-wired in the other voltage-in pad into the Dodo as it takes 2-6S input and also acts as VBAT, so this is a nice and simple process. The 5v regulator will not be needed in this build, but it’s nice to know it’s there if I was to use another flight controller - many such as the Naze32 still require 5v power and would be fried without a BEC. This is another reason I run the LittleBee 20A ESC’s - they are so small and light because they don’t follow the traditional standard of having an on-board BEC (5v out), and so need less components (known as an “Opto” ESC).
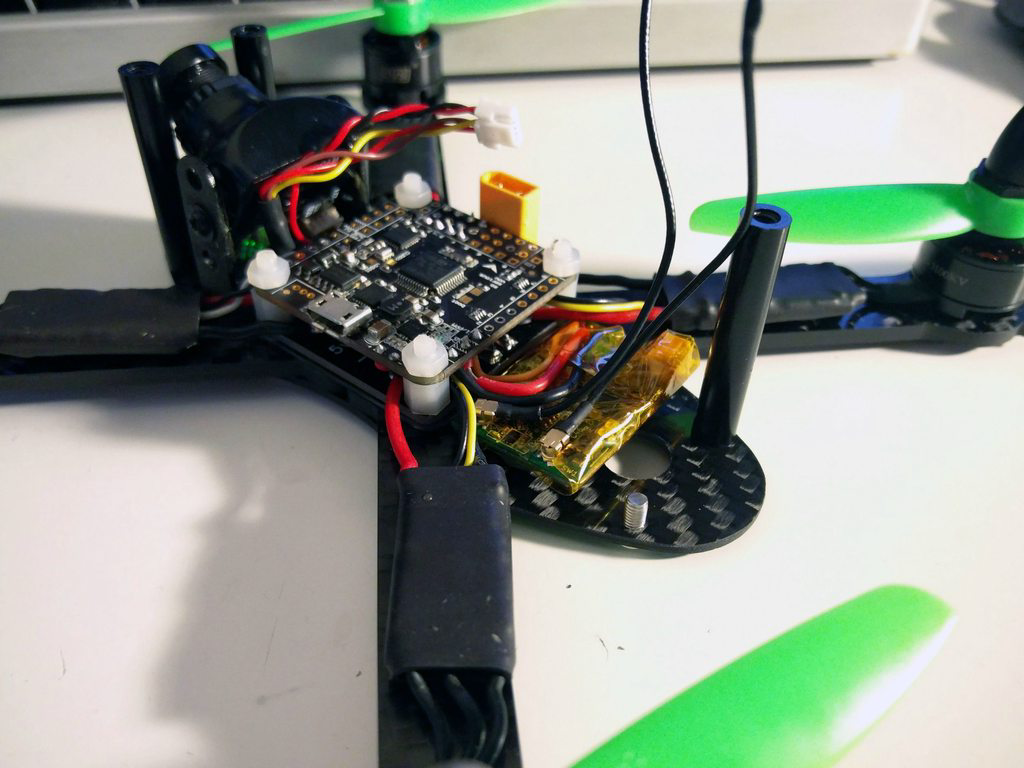
The most time-consuming part of the build was actually working out where I was going to put the receiver. I didn’t really want to put it on the top plate as I already have the VTX there and I want the battery strap to be clear of any components to save damaging anything on a crash when strain is put on it from the weight of the battery. I did think of putting it on top of the FC with a bit of double-sided sticky tape, but I didn’t want it to come unstuck, or again, damage anything in a crash. It’s a little bit of a tight area as it will not fit long-ways because of the rear standoffs being too close to the flight controller, and it only just fits this way if I offset it onto the arms with a “tower” of double-sided sticky tape you cannot see below it. This is ok for now, but if I can find a better way of doing it down the line, I will be changing it. I must admit I do like it here in this position because it makes changing the antennas super easy if I cut them up them in a crash from prop strikes.
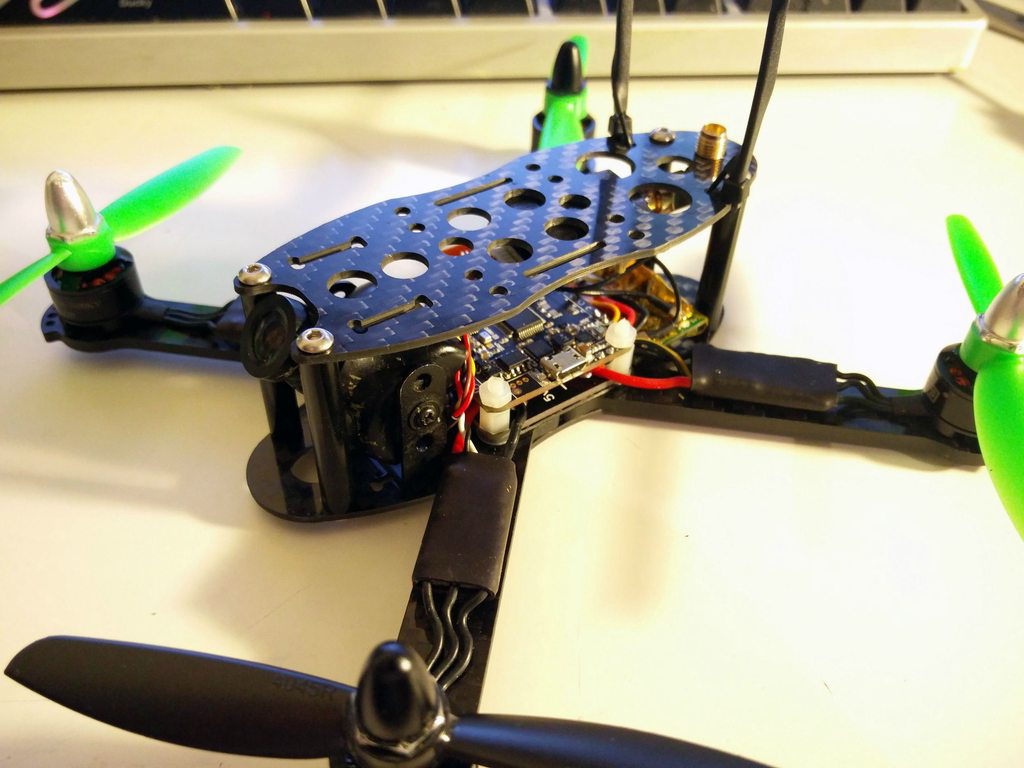
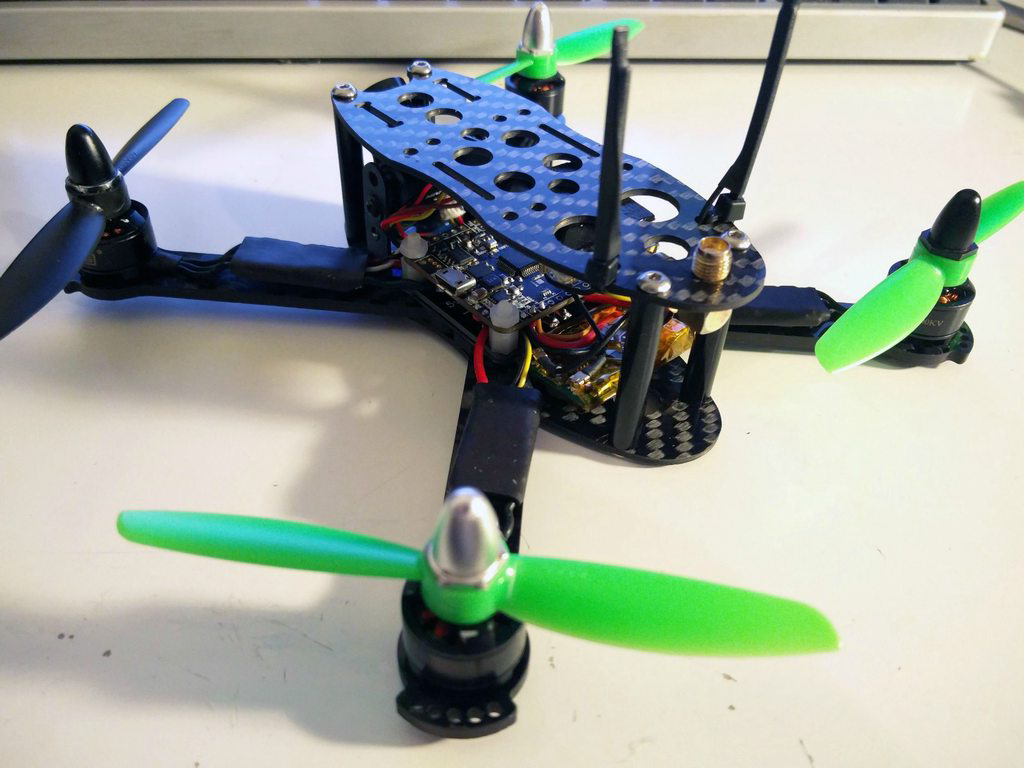
So we’re at that point of getting the top plate on and the VTX in! Pretty self-explanatory, a bit of double-sided sticky tape to attach it to the top of the frame, connect the loom and we’re good to go. I’ve also done my age-old trick of using cable-ties and heatshrink for the antennas. This is actually really handy for another reason - if for any reason I need to take the top plate off (which happens), the connector for the VTX is easy as it’s just a plug, but it’s always been a pain to remove the antennas. There’s never usually enough length left on the antenna cable to leave them attached but move the top plate out of the way. With this setup and where I’ve positioned the receiver, the fact they are easily accessible means I could actually just unplug them from the receiver which would save me having to reapply heatshrink on the cable-ties every time the top plate comes off :) The only issue with this is I’ve no clue how the connectors would wear (from connecting and disconnecting them often), but a few times shouldn’t hurt.
For anyone wondering - I had already “de-pinned” the D4R-II receiver on the last build, and simply wired in a servo connector extension to keep the receiver as lightweight and small as possible. This was also hard-wired in to the flight controller to save weight and remove all the connectors. It’s wrapped in Kapton tape which I actually have for my 3D Printer, but it’s a very useful high temperature resistance sticky tape that’s also lightweight and does not conduct, so useful for wrapping stuff, to stuff!
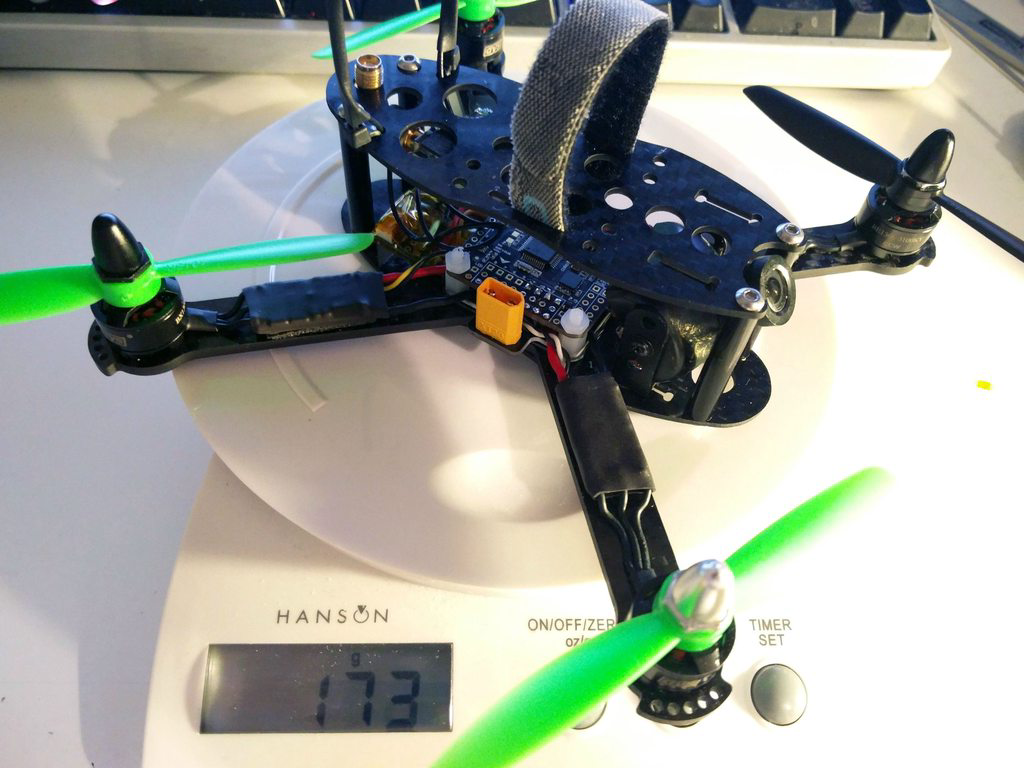
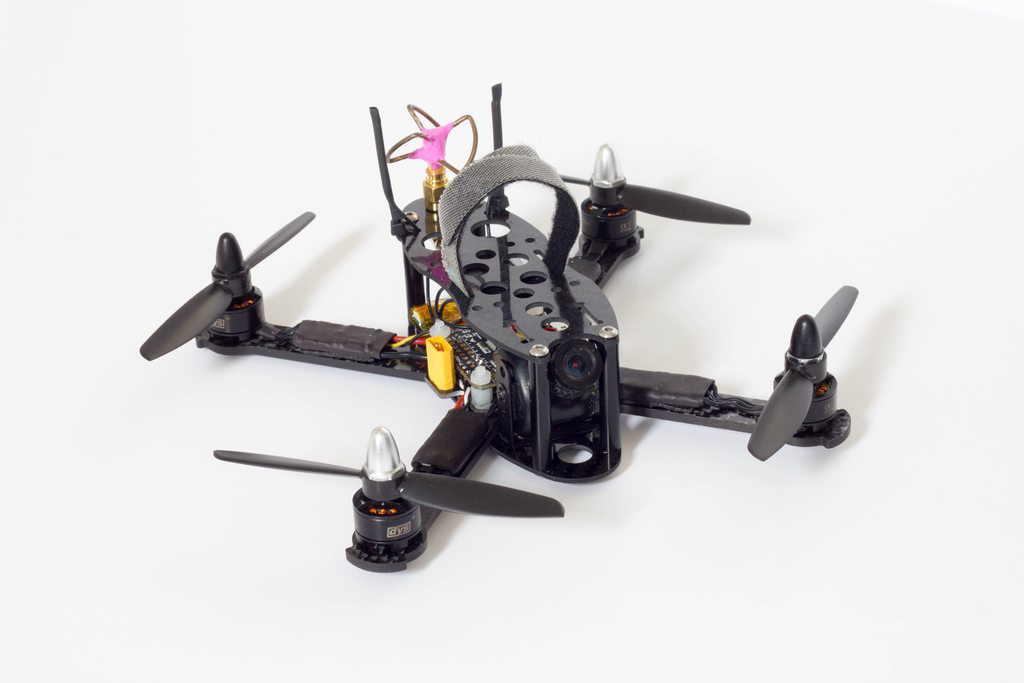
So this is probably one of the most important and impressive things about it - the frame with everything in (sorry forgot to add the vtx antenna) is only 173g! My kermit was a whole 25g heavier - which when you think about it isn’t that much on a 250, but on a frame of this size it’s a huge saving.
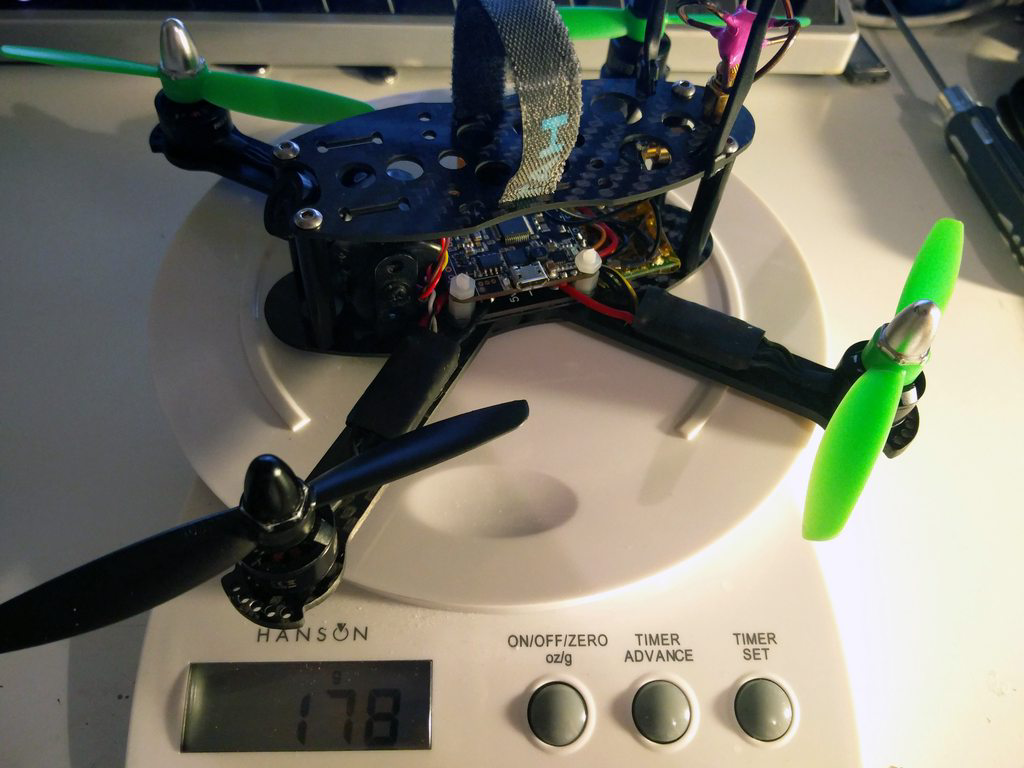
I did end up rechecking the weight and so used the same antenna I was using on the Kermit, we can see it only adds 5 grams to the above weight. I expect the Fatshark antennas to add another 5g onto that, so a very light 180 quad that is ready to rip around indoor arenas and car parks or just tight proximity areas. So even on a heavy antenna setup, we are still saving weight - but more importantly, the design of the frame should give that edge in a racing scenario - “X-Frame” quadcopters are very much back in fashion after we have seen their benefits.
Conclusion
Well simply put, what can I say? It’s a really really nice frame, there’s absolutely nothing I would change or could even criticize which I think is a first on any frame I’ve had. I’ve flashed the latest version of Betaflight on it, so now it’s just a case of waiting for the good weather to appear and then give it hell. I expect it to perform amazingly, and now that concludes all of my quads being X-frames! More on that in another post, I need to write up the long-awaited TSX250 build, of which I was flying at the UK Drone Show on the weekend just gone.
If you are looking for a 180 build - I would highly recommend this frame, in fact I would question any other frame choice. There has been a lot of thought gone into it, and you can see that immediately. I know there are other KC frames in the works, so I am very excited to see what they bring out as there is a lot of thought that goes into the designs, and the quality of the carbon fiber is also very very good.
You can purchase the frame at I-Drone or Direct from Stanton Frames and more info available on Facebook.
